WordPress is a free blogging platform. It’s an easy-to-use, fast and flexible blog script. It offers you a great set of features that has been designed to make your blogging experience as enjoyable as possible. In two words, WordPress allows you to:
- Create a blog.
- Publish and edit posts.
- Post Categories and Tags.
- Search for something in your content.
- Manage user access to your posts.
- Change the themes of your website and much more.
How to install WordPress?
As for installing WordPress, there are two ways to do it. In case your hosting control panel (cpanel) offers you a fast automatic installation option of this CMS (quick install), we recommend opting for this way of installation as it allows you to save a lot of time and effort. On the other hand, even if you can not find this tool on the dashboard of your hosting panel, do not worry, as the manual installation of WP does not require advanced technical knowledge and is easier than it seems.
Manual Installation Guide
Step 1: Download the WordPress installation package.
To start the installation process, you first have to download WordPress from its official download page. We recommend that you always download and install the latest version of WordPress.
Step 2: Upload the WordPress files to your server.
Now, you need to upload the extracted files and folders to your web server. The easiest way to upload the installation files is to do it via FTP or your hosting File Manager.
Important: If you want WordPress to be accessible in your main domain (ie www.yourdomain.com), you must upload the extracted files to the public_html folder.
Step 3: Create a MySQL database for WordPress.
Now, you need to create a MySQL database (using your database wizard or another tool of your cpanel ) and assign a user with full permissions to this database. For detailed instructions on how to do this, please look for tutorials on the web. Once you create your MySQL database with an assigned user, be sure to write down the name of the database, the database user name, and the password. You will need this information to complete the installation process.
Step 4: Complete the installation process.
Now is a good time to navigate to your website and start the installation process. If you have uploaded WordPress to your public_html directory, open http://yourdomain.com in your preferred web browser. The first thing you will notice is a message that tells you that you do not have a wp-config.php file and you must create one. Simply click the “Create a configuration file” button to continue.
In the page that opens, you will notice a message that asks you to prepare the necessary information for the installation. As we already have this information, simply click on the “Next” button.
Enter the details of your newly created MySQL database and click the “Submit” button.
WordPress will check if the settings are correct. If you have specified all the required information, a confirmation screen will appear. Click the “Run Setup” button to continue.
In the next screen you will have to enter your administrative username and the title of your new site. In addition, you can determine if you want search engines to index your site or not. Add this information and click on the “Install WordPress” button.
That is all!
Once you have installed WordPress, you can start building your blog. First, open the WP admin page. The URL is www.yourdomain.com/wp-admin
On the login page, you need to enter the username and password that you specified in the WP installation step.
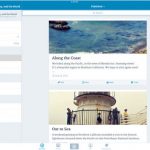
Before you start posting to your newly created blog, you need to customise your layout. Well, you can choose a free theme in the WordPress themes directory or purchase, upload, install and activate a premium theme. We suggest starting with KLEO Theme by SeventhQueen as premium themes are characterised by much higher quality compared to free themes.
To start writing and posting posts to your WordPress blog, simply click on the “Posts” option in the sidebar on the left, and then on “Add new”. It will open a page where you can create, edit and publish blog articles.
Click the “Publish” button once you have prepared your post, and your article will be immediately visible on the blog’s cover page.
It’s all very easy, right?
We wish you much success in developing your new blog or business site!


No Comments
Leave a comment Cancel